¶ Field Validation
This module contains shared objects and functionality with other modules we are currently developing. For use (and on premise compilation) of this extension, Compliance Essentials is required for compiling and use of both as objects and in the license. The module Compliance Essentials comes with no additional costs and is by default attached to any Compliance Field Validation installation on Dynamics 365 Business Central.
Default Microsoft Dynamics 365 Business Central offers no functionality to enforce business rules and enhance data quality in the system. When creating new items, customers and suppliers, it is important that fields such as booking groups, valuation method and payment conditions are correctly set up. Managing master data yourself can be very time consuming, but for a correct processing of (internal) orders it is important that the master data is correct.
With the extension Compliance Field Validation the quality of your internal information processing will be enhanced. For every table (default, partner or customization) you can determine requirements of field values entered. Depending on the setting, the user will receive a warning or an error message.
To be able to use the Field Validation extension, it is mandatory to register the module first.
Find here how to do this.
¶ Manually create a new Field Validation
Search for Field Validations.
Click on “New”.
.png)
Fields in the “General” tab (header) :
.png)
No.: When automatic no. series is set up, generally this number will be created automatically when you choose the table to set a validation for. Otherwise, fill in a number manually.
Description : Add a Description for this validation e.g. Item validation.
Table ID : Select the table to set a validation for.
Validation Type : Choose the Validation type Warning or Error.
- Warning: a message will appear when the validation has not been met, but the system will not hold.
- Error: a message will appear when the validation has not been met and you will not be able / allowed to proceed until the error has been corrected.
Init Values : Used to define initial values when creating a new record, thereby ensuring certain conditions can be set before the Field validations are triggered.
E.g. to have an item card automatically set to blocked when a new card is created.
Conditions : The condition(s) that have to be met when the Field validation has to be triggered.
E.g. the validation has to be executed, when the card is being unblocked or when a document is released.
Action after Validation : When the record does not meet the requirements which are set up in the lines of the validation, this action will be performed.
(Note: this option is only available in combination with validation type ‘Warning’.)
E.g. when validation has been triggered, but the field values are not according the requirements, the card will be set to blocked again.
Toggle “Validate Default Dimensions" : When switched to ‘On’, the global Default Dimension settings for this table will be validated when the Field validation is triggered.
To view / setup the “Table Default Dimensions setup”, use the option in the ribbon.
Starting Date : Choose the starting date for the Field validation. If left blank or if the date is in the future, the Field validation will not be active.
Show more : Clicking on “Show more” will show more fields in the header :
.png)
Lookup Page ID : Specifies the lookup Page ID that is used in the Check Table function.
Toggle “Insert Check” : When turned to ‘On’ the validations have to be checked at the Oninsert trigger.
Toggle “Display results in message” : Specifies whether the results have to be presented as a message or a page. This type of notification may be necessary as soon as it is generated from a certain type of page where an other generated error may block further processing.
Ending Date : Optionally, an Ending date can be set, e.g. if this Field validation has to be valid until a specific period of time. When this date is in the past, the Field validation will be inactive.
Setup Field Validation rules in Tab “Lines” :
In the field validation lines you can set up your business rules:
Validation Type:
- Mandatory : field cannot be empty
- Filter : apply a filter on a field, e.g. a decimal field that should have a value >100
- Length : length of a field, e.g. a phone number must be between 10 and 20 digits
- Related No. of records : to be used on a related table, e.g. a customer must have at least one valid sales price
- Related Field : compare related fields to each other, e.g. in a sales order the Customer Posting Group must be the same as on the customer card
- Regular Expression : can be used with RegEx (Regular Expression) commands, any RegEx can be applied.
- Calculated : this type will validate by System Variable or a calculated filter based on the logged in user.
Field No. : Select the field that needs validation by using the AssistEdit button on the Field No. or fill in the table ID.
Field Caption : This field will be filled in automatically after you have chosen a Field No.
Table Relation No. : To set up a validation using a table relation, use the AssistEdit button to select the one required.
Validation Value : Set the value to which the validation has to be made. (not required with types Mandatory and Regular Expression)
Calculated filter : To set a validation according a calculated filter. When using the AssistEdit button, a number of pre loaded variables will be visible. Find below a more detailed explanation of working with Calculated filters.
E.g. SALESPERSONNO will set the filter on the salespeople/purchase person.
Regular Expression : Click on the AssistEdit button to use a RegEx to which a field has to be set. A few RegEx have been pre loaded with the installation.
E.g. MAIL will set how to compose an email. Find below a more detailed explanation of working with Regular Expression filters.
Conditions Related Table: When validation with a Table relation is chosen, condition(s) on the related table can be set here.
Notification : Specify a custom Error or Warning message which will appear when the validation is not met. A sample notification is already pre loaded.
Table Relation Validation Type: When the Validation Type “Related Field” is selected, the relation between the fields of the table relation can be set here.
Available options are :
- Equal
- Not Equal
- Greater than
- Lower than
- Greater or equal than
- Lower or equal than
Related Field No. : Choose the field of the related table in relation to the field selected in “Field No.”
Field Caption : Will be filled in automatically after the “Related Field No.” has been chosen
! Note :
It is inactive if :
- the Starting date doesn't contain a date in the past or present;
- the End Date (when used) is a date in the past. (!);
- a user has not been given the permission set 2C FIELDVAL USE.
To activate this Field Validation, the user who set up this Field Validation should log out and then in again of Business Central.
This applies also to the user(s) for which this Field Validation was set up.
Options in the top bar of the overview of Field Validations :
.png)
Manage : When a validation is highlighted/selected, the following will become visible : “Edit”(to edit the highlighted validation), “View”(to view the highlighted validation) and “Delete”(to remove the highlighted validation).
Check table : When an active validation has been highlighted/selected, using this option will calculate the outcome of the validation and show it in a separate view (“Field Validations Check Overview"). Via this overview it's possible to solve the issues by selecting one and using the “Open related page” in the top bar of the view.
.png)
This will open the page which has the issue, giving the opportunity to resolve it.
Closing that page, returns to the ‘Field Validations Check Overview’ which should be updated in case the issue in the opened page was resolved.
“Field Validation Filter” : The AssistEdit button can be used to select an other Field Validation. When an other Field Validation is selected, the button “Calculate” in the top bar of this view will recalculate the view to the results of that Field Validation.
! Note : results will only be visible if the Field Validation is active (has a Startdate of today or in the past, and no Enddate in the past) and has records that do not fulfill the requirements of that Field Validation.
Copy : To copy the selected Field Validation and save it as a new one.
Comments : Additional comments can be added here.
Companies : In stead of setting up a Field Validation for all Companies, it is possible to set up a Field Validation for a specific Company by selecting the specific Company with this option.
Permission Sets : To set up if a Field Validation has to be valid for only one or multiple Permission Sets.
Change Log Entries : Overview of changes made after initial first setup of the selected/highlighted Field Validation.
¶ Field Validation with Regular Expressions
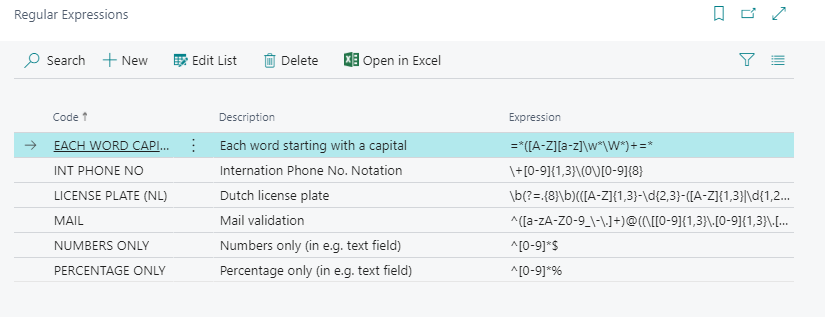
Since version 1.2.0.202010 you can use the validation type Regular Expression. A Regular Expression is a string of characters that define a search pattern for (in this case) input for the validation. On the Field Validation Settings page, standard data (Regular Expressions) can be loaded to be used in Field Validations. Personalized validations can also be added on the Regular Expressions page.
To use a Regular Expression, the following steps have to be taken in the Field Validation:
- In the validation line, select the validation type Regular Expression
- Select the field that has to be validated
- Select the Regular Expression to be used to validate.

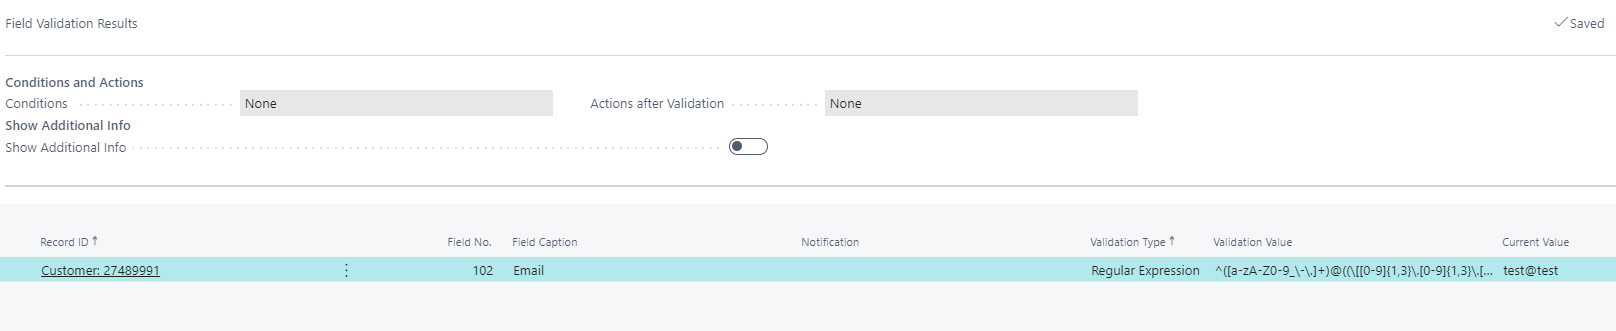
In this example it has been chosen to use the Regular Expression “MAIL” for the Email field. This ensures that the mail address must exactly match the Validation value.
For example, when on a Customer card an email address has been entered that does not comply to the Regular Expression, a warning will pop up as shown below.
! Note :
The Field validation is inactive if :
- the Starting date doesn't contain a date in the past or present;
- the field End Date (when used) contains a date in the past. (!)
- a user has not been given the permission set 2C FIELDVAL USE.
To activate this Field Validation, the user who set up this Field Validation should log out and then in again of Business Central.
This applies also to the user(s) for which this Field Validation was set up.
¶ Dynamics 365 Copilot Regular Expressions Generator
Designing regular expressions can be a complicated and time consuming process.
From Business Center version W1 24.0 and up, a Copilot will be available to make this much easier.
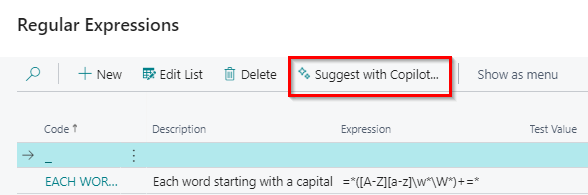
To add a Regular Expressions, use the “Suggest with Copilot” button.
This will open a pop up where a Prompt has to be provided. The pop up advises how to assemble a prompt. Make sure the prompt has the proper format and examples. There is also the possibility to make use of the Prompt guide (button next to the button “Generate”) where also the option to view a Demo Video on our YouTube channel is available, of the use of this Copilot feature.
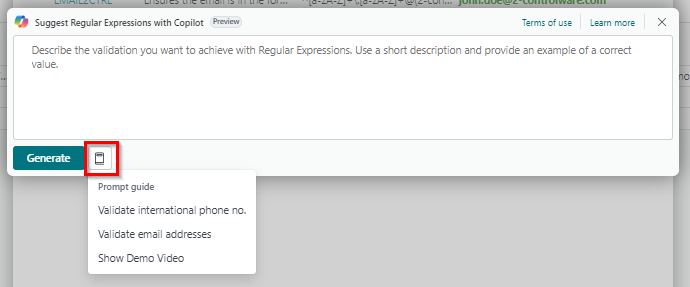
As an example for a prompt : ‘Validate that an email address is in default mail format and consists either the domain 2-control.nl or 2-controlware.com and that it contains firstname.lastname before the @. Example: john.doe@2-control.nl or john.doe@2-controlware.com’
To make sure a regex will be presented, which will avoid any wrong values can be entered, it is best to be as specific as possible when composing your prompt.
After completion of the Prompt, click on “Generate” and Copilot will generate a proposal for a regular expression which can be tested right away.
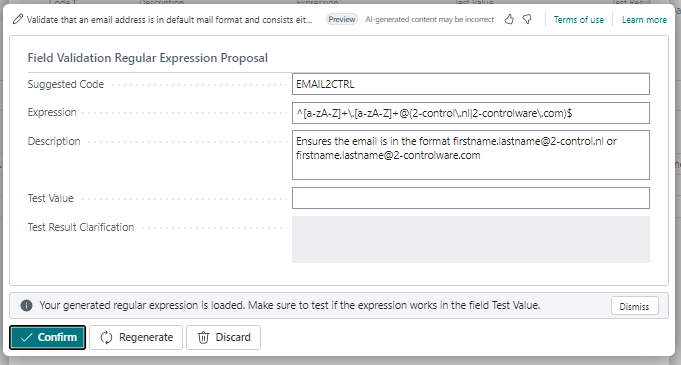
Suggested Code : Proposed code for the regular expression.
Expression : Expression proposed by Copilot for the prompt given.
Description : Description of the regular expression as a result of the prompt given.
Test Value : To test if the given value is correct.
- When the value is correct : value turns Green
- When the value is incorrect : value turns Red
Test Result Clarification : Clarifies why a test value is incorrect.
When satisfied with the proposal, click on “Confirm” to save this regular expression as proposed.
The regular expression Code was suggested by Copilot, but you can change this before you confirm.
Confirm : Confirmation for addition of the new regular expression. The question will be asked if you want to save it.
- Yes : The new regular expression will be saved and can be used in a validation
- No : Cancels the addition of the proposed regular expression and returns to the proposal window to make any changes
Regenerate : Regenerates a new regular expression. In case another regular expression is generated, re-examine the given suggestion. The prompt given was probably not detailed enough to generate only one possible expression.
Discard: Discards the proposal of the new regular expression and closes the proposal window.
Dismiss : Closes the message “Your generated regular expression is loaded. Make sure to test if the expression works in the field Test Value.”
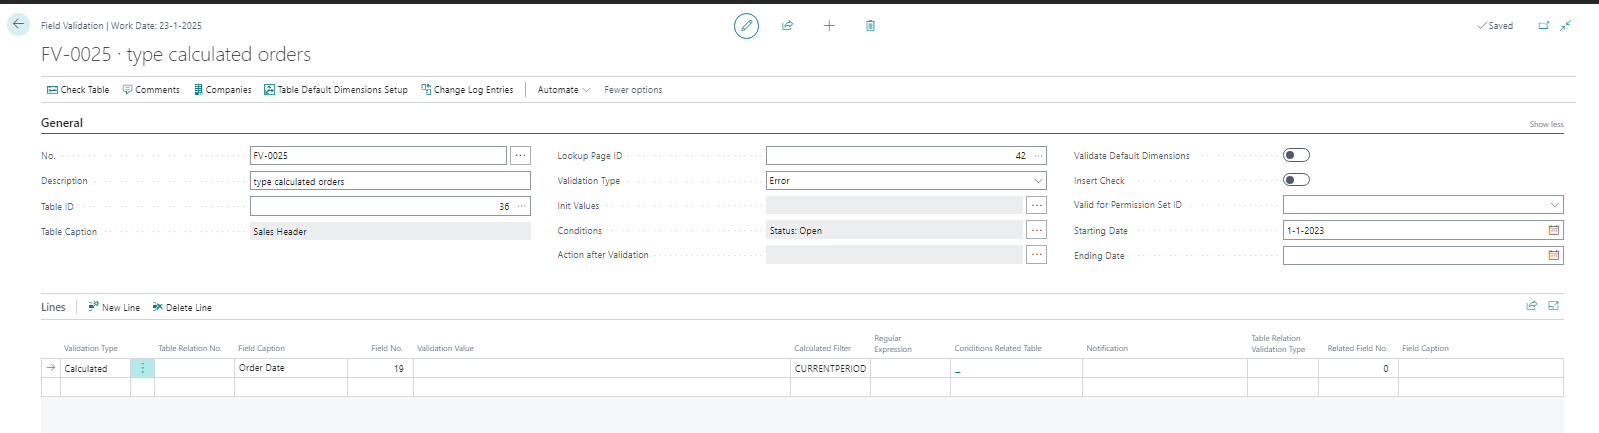
¶ Field validation with type Calculated
Since version 3.2.20210NN.0 a validation can be performed with the type Calculated. This type allows you to validate by System Variable (User ID, User Security ID and Current Company, by type Date Formula and by the logged in user where the system can use the table 91 (User Setup) and table 156 (Resource).
The field “Validation Type” must be set to ‘Calculated’ to be able to select a Calculated filter in the “Calculated Filter” field.
Examples of Calculated Filters can be imported from the Calculated Filters page with the button Load Demo Data.
In the below example the validation on the Order date will be triggered with the calculated filter CurrentPeriod (=this month).
When the Order date is not in the current month (in this case January) and the status of the Order is / changes to Open, an error occurs.
! Note :
The Field validation is inactive if :
- the Starting date doesn't contain a date in the past or present;
- the field End Date (when used) contains a date in the past. (!)
- a user has not been given the permission set 2C FIELDVAL USE.
To activate this Field Validation, the user who set up this Field Validation should log out and then in again of Business Central.
This applies also to the user(s) for which this Field Validation was set up.
¶ Create a Field Validation with the wizard
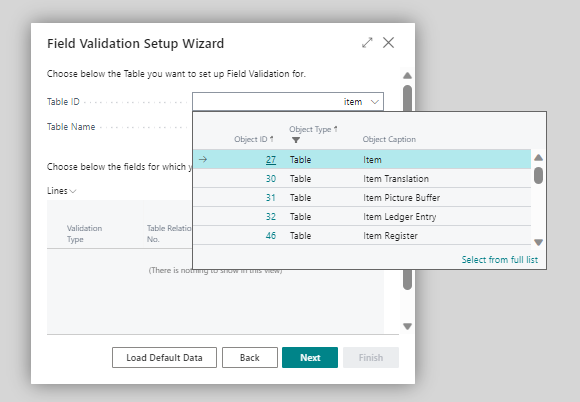
To set up a simple Field Validation, search for ‘Field Validation Setup Wizard’ and select it from the list.
In the field Table ID, choose a table to validate the fields in. Click on the drop down arrow to search for a table, type the Table ID, or type the name of the table.
In the Lines, select the required type(s) of Validation and fill in the field(s) and how the data is to be validated.
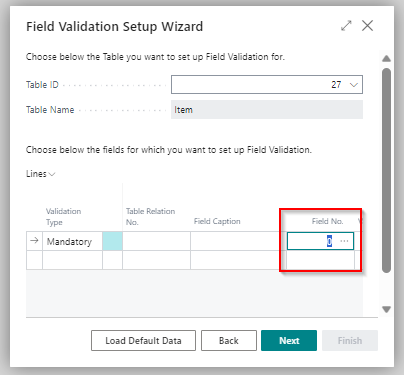
Click ‘Next’ and ‘Finish’ to save the configuration.
The current date will automatically be used as the Startdate.
If any initial value, condition etc. would be required, open the new generated Field Validation to set up those options.
! Note :
The Field validation is inactive if :
- the Starting date doesn't contain a date in the past or present;
- the field End Date (when used) contains a date in the past. (!)
- a user has not been given the permission set 2C FIELDVAL USE.
To activate this Field Validation, the user who set up this Field Validation should log out and then in again of Business Central.
This applies also to the user(s) for which this Field Validation was set up.