This module contains shared objects and functionality with other modules we are currently developing. For use (and on premise compilation) of Compliance Field Security is required for compiling and use of , both as objects and in the license. The module comes with no additional costs and is by default attached to any Compliance Field Security installation on Microsoft Dynamics 365 Business Central.This module contains shared objects and functionality with other modules we are currently developing. For use (and on premise compilation) of Compliance Field Security is required for compiling and use of , both as objects and in the license. The module comes with no additional costs and is by default attached to any Compliance Field Security installation on Dynamics 365 Business Central.
Default Business Central (both on-premise and hosted versions) offers no functionality to secure or validate fields within tables. Often, the default permission sets do not provide the desired level of security. Furthermore, you cannot easily apply security based on a filter in. Finally, in default Business Central it is not possible to secure actions on pages.
The extension Compliance Field Security offers the possibility to secure fields, actions on pages and datasets in tables. With the module Field and Dataset Security the data owners are able to manage their own field security and dataset security.
To be able to use the Field Security extension, it is required to register the module.
Here you will find how to do this.
Field Security revokes fields from particular users.
¶ Field Security
¶ Manually create a new Field Security
Search for Field Securities.
Click on “New”
.png)
The page will open with a new Field Security to be made :
.png)
No. : When automatic no. series has been setup, generally this number will be created automatically when a table is selected to set a security for. Otherwise, fill in a number manually.
Description : Add a Description for this record e.g. Secure posting groups items.
Table ID : Select the table to secure.
Table Caption : Will be filled in automatically after selecting the Table ID.
Default Editable (toggle) : Depending on the number of fields to secure, select enable Default Editable. As shipped, the software disables editing of defined fields, but when Default Editable is enabled, the fields have to be defined which are not editable. For now we assume Default Editable is not set to ‘true’.
Starting Date : To activate the Field Security, fill in the date of today, or a date in the past
Error Message : Fill in a specific error message that has to pop up when the security kicks in and a warning appears.
Show more : Will show more fields in the header :
.png)
Filter Field No. : Use the AssistEdit button to choose a field to be filtered on, which has to be active
Note that only fields in the same table can be filtered to set up the field security for.
Filter Field Caption : Description of the chosen Filter Field No. (filled automatically)
Filter Value : Enter the value of the Filter Field No. which will be the filter for the table for which the Field Security is setup
The field security is now only active on lines in the table that adhere to the filter setup in the “Filter Field No.” and “Filter Value”.
Ending Date : Set an end date if the Field Security has to become inactive after a specific date.
Set up Field Security rules in Tab “Lines” :
In the field security lines, the rules are set up for that table (and field filter, if set).
.png)
Field No. : Use the AssistEdit button to add the field users are not allowed to edit. A list with all fields in the table opens. Select the field to secure and confirm with “OK”.
Field Caption : Will be filled in automatically after a field no. has been chosen.
Editable : This box will be checked by default when the toggle “Default Editable” is set to “No”. If the toggle is set to “Yes”, this box will be unchecked by default.
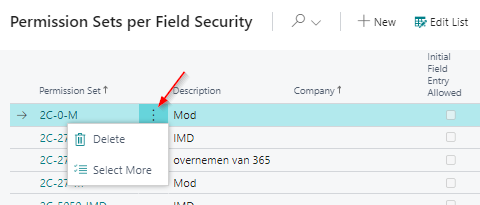
No. of Linked Permission Sets : Shows the number of Permissions Sets for which that security line is active. To remove an assigned permission set from this column, click on the number in that column. To choose multiple sets at once, click on the 3 vertical dots and choose “select more”.
The 3 dots in the top shows the following options :
- Delete the chosen sets
- Remove the chosen sets from all Security Lines
- Copy the chosen sets to all Security Lines
- Replace the chosen sets on all Security Lines
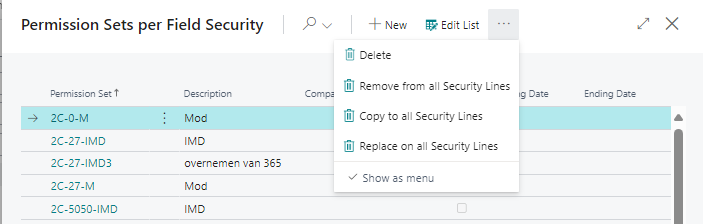
To remove only 1 set from that column, click on the 3 vertical dots and choose “Delete”
For these permission sets, the option that it should be valid for a specific company, if that permission set is allowed Initial Field Entry and/or a Starting and Ending Date can also be set.
Edit these options after selecting the “Edit List” on top.

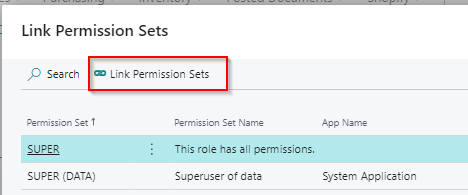
No. of Not linked Permission Sets : Shows the number of Permission Sets for which that security line is not active. Click the number in that field to move a set to the ‘Linked’ column. This opens the overview of the Not linked permission sets. Click on the permission set that has to be moved to the ‘Linked’ column and then click on Link Permission Sets.
The 'NoOfLinkedUsers' column shows how many users have been assigned that particular permission set.
.png)
Description : Option for additional information (does not show up in the message)
Error Message : When the toggle “Default Editable” is set to “No”, a specific message per line can not be set. If the toggle is set to “Yes”, a specific message per field line can be set.
Options in the top bar of the lines :

Manage : When lines are already set up, the 2 options will become available :
- New Line : Will insert a new security line
- Delete Line : Will remove the selected security line
Line : Shows the option of “Linked Permission Sets” to show the sets assigned to the selected line
Functions : Shows the option “Copy linked Permission Sets to all Security Lines” which will copy the linked permission set(s) of the selected line to the other lines. The question appears if you are sure this is what you want.
.png)
Options in the top bar :
.png)
Copy : To copy the selected Field Security.
Effective Securities : To calculate the sources (Users or Permission Sets) associated with the secured table. (more details)
Not secured User/Permission Sets : To calculate the unlinked Users/Permission Sets concerning that particular security. (more details)
Comments : Can be used for additional information/comments regarding that Field security.
! Note : the Field security is only active if linked to permission sets.
It is also inactive if :
- a user has linked permission set(s) assigned to the Field security AND a permission set with both insert, modify - and optionally delete - permissions which is NOT linked to the Field security;
- the Starting date doesn't contain a date in the past or present;
- the field End Date (when used) contains a date in the past. (!);
- a user has not been given the permission set 2C FIELDSEC USE.
To activate this Field Security, the user who set up this Field Security should log out and then in again of Business Central.
This applies also to the user(s) for which this Field Security was set up.
¶ Advanced settings
Field Security accepts plain text filters and numbers. Furthermore, any filter used on a list in Microsoft Dynamics 365 Business Central is accepted. The only limitation is that filter values must be plain text, i.e. use of variables (like T for today's date), SQL queries and calling methods is not supported.
Test any filter before configuring the Field security on the list itself; e.g. if a filter is required in items on the field Type, manually filter on the value and test whether it works with the values as expect. Any line in the results is authorized to the user.
| Syntax | Character Description | Description | Example |
|---|---|---|---|
| Value | Equal to the value that is entered. | Type the value to find. | Smith finds “Smith”. |
| Value* (asterisk) | Starting from the value that is entered. | Type the starting value and then an asterisk (). | S finds any string that starts with “S”, Such as “San Francisco”. |
| *Value* (asterisk) | Containing the value that is entered. | Type an asterisk, then a value, and then another asterisk. | *th* finds any string that contains “th”, such as “Northeast”. |
| ? (question mark) | Having one or more unknown characters. | Type a question mark at the position of the unknown character in the value. | Sm?th finds “Smith” and “Smyth”. |
| Value | Value (pipe character) | Select multiple values from e.g. an option field, separated by | selecting Multiple values. | Works like Or. The only option when filtering on an option field. | Invoice, Credit Memo finds Invoice or Credit Memo |
In addition to a complete block of modification of fields, Field security also has the possibility to allow an initial entry and block any modification afterwards.
A scenario for this is creation of customers and vendors based upon templates: a user can create a new customer based upon a template by which the fields for posting groups are filled automatically. After creation, the fields cannot be modified by users who are not authorized to do so.
As an example, follow these steps to enable initial field entry for the posting groups in the customer table in an existing Field security.
- In Business Central, search for Field Securities;
- Open the existing Field security for the customer table;
- Toggle the switch “Default Editable”. Confirm with Yes when the message appears regarding the reversing of the logic of the security of fields already defined.
.png)
- In the header, add an error message which will be copied onto the error message in the lines while creating them;
- If not set yet, set the Starting Date (of today or earlier);
- Add the VAT Bus. Posting Group (field no. 110), Customer Posting Group (field no. 21) and Gen. Bus. Posting Group (field no. 88) one by one to the lines from the field list by using the AssistEdit button or entering the fieldnumbers manually, and confirm with OK;
- Keep the boxes of “Editable” unchecked;

- Link permission sets to every line. Keep in mind that the Field security is still inactive for a user with a permission set not linked to these three lines. *You can create a data owner using this principle: a user who is able to modify these fields.
- Enter a Description on the line, e.g. Use of customer templates;
! Note : the Field security is only active if linked to permission sets.
It is inactive if :
- a user has linked permission set(s) assigned to the Field security AND a permission set with both insert, modify - and optionally delete - permissions which is NOT linked to the Field security;
- the Starting date doesn't contain a date in the past or present;
- the End Date (when used) is a date in the past. (!);
- a user has not been given the permission set 2C FIELDSEC USE.
To activate this Field Security, the user who set up this Field Security should log out and then in again of Business Central.
This applies also to the user(s) for which this Field Security was set up.
¶ Skip on Indirect Approval Actions
In the Field Security Setup, there is a switch to set up if Indirect Approval Action has to be skipped.
By default this switch is turned to ‘Off’.
.png)
Should it be desired that the Field and Filter security is skipped when the status ‘Pending approval’ changes in purchase or sales orders, this switch should be turned to ‘On’.
¶ Dynamics 365 Copilot to create a Field Security
Copilot can be used to create a Field Security.
Generate a Field Security by using prompts.
To watch a demo on how to use the Copilot option, watch the video on our YouTube channel.
¶ Create a Field Security with the wizard
Creating a Field Security to authorize users to edit specific fields of a table with the wizard :
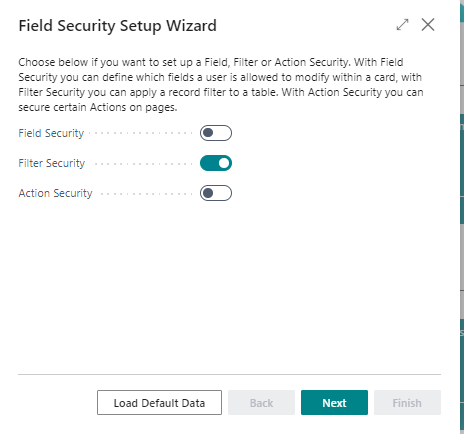
Search for Field Security Setup Wizard and click on “Next”.
Toggle the switch for Field Security to on.
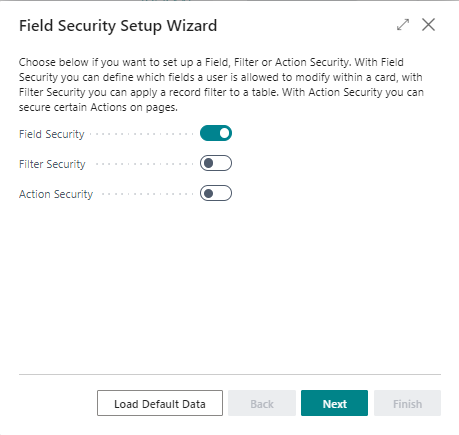
Click “Next”.
Select a table in which you want to secure the fields, by using the drop down button or enter the object Id or the table name in the “Table ID” field.
.png)
After selecting the table, choose individual fields on the lines.
.png)
Depending on the number of fields to be secured, enable Default Editable. As shipped the software disables editing of defined fields, but when Default Editable is enabled only the fields which are editable have to be defined. For now, we assume Default Editable is disabled.
Add the fields you do not want users to be able to edit by clicking AssistEdit button of the Field No. on the first line.
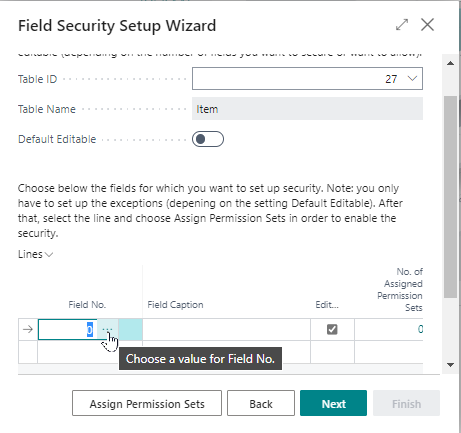
A list with all fields in the table opens. Choose the field(s) you want to secure and confirm with “OK”.
The field Description allows you to document the purpose of securing the field (e.g. posting groups only for manager)
The field Error Message allows you to have a specific error message pop up when the validation kicks in and a warning appears.
In the field of Not Assigned Perm. Sets, the (number of) Permission Sets are shown who are allowed to edit the field. When you click on the button Assign Permission Sets, you can add the permission sets which will not be allowed to edit the field. You can do this by clicking on Edit List (after you clicked on the button Assign Permission Sets) and filling in the permission set. Should you want one of the permission sets mentioned in the Not Assigned column to move to the Assigned column, you have to click on the number in that field. This opens the overview of the Not Assigned permission sets. Click on the permission set you want to move to the Assigned column and then click on Link Permission Sets.
When you are done choosing the fields and/or arranging the permission sets, click on “Next” and then “Finish”. The system automatically has assigned the date of today being the Starting date for that Field Security.
! Note : the Field security is only active if linked to permission sets.
It is inactive if :
- a user has linked permission set(s) assigned to the Field security AND a permission set with both insert, modify - and optionally delete - permissions which is NOT linked to the Field security;
- the Starting date doesn't contain a date in the past or present;
- the field End Date (when used) contains a date in the past. (!)
To activate this Field Security, the user who set up this Field Security should log out and then in again of Business Central.
This applies also to the user(s) for which this Field Security was set up.
¶ Filter Security
Default Business Central offers no functionality to secure subsets of data within tables. With the extension Filter Security you can define filters with which you can limit the permissions of users. Note that filtering is supported on any field type except flow fields and only fields in the same table as the records you want to filter on.
The principle of the extension is to permit editing with authorized permission sets. An active security filter has today's date or a date in the past in the field Start Date.
¶ Manually create a new Filter Security
Search for Filter Securities.
Click on “New”
Select the ID of the table that you want to secure on field level. You can use the list of tables or enter the object id directly. A Filter Security record number will be created automatically.
.png)
Add a Description for this record. In this example we will filter on table 38, so we use this as the description: Filter Security table 38
Filter Security splits a table using filters on fields in the same table. Through permission sets, a part of a table is assigned. Any permission set might be used, but for ease of administration and documentational purposes, the use of clear names and descriptions is strongly recommended.
As an example : in the case of document types, six permission sets would be required, one for each document type.
You could, for instance, use the following permission set names for Purchasing :
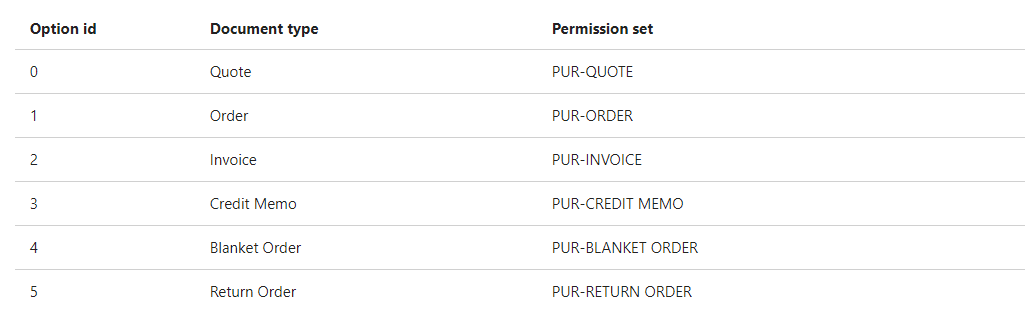
- Option id is the place in the option list the document type is found;
- Document type is its textual name;
- Permission set is the name of the permission set we are going to create.
Purchase documents consist mainly of two parts: the header and the lines.
In the header, information about the vendor, like invoice and payment, is stored.
The contents of the document are defined in the lines, such as the number of items and the price.
For a correct authorization of purchase documents you need two filter securities: one for each table.
First we configure splitting up table Purchase Header.
Set up a filter :
- Choose the field you want to filter on in “Filter Field 1” by opening the list of fields in the table using the AssistEdit button. Alternatively, you can enter the field Id.
- Fill the filter value you want to assign in the field “Filter 1”. In the example below, every document type in the table has its own line
.png)
The field ‘Document Type’ is an option field. This means it only accepts predefined input. Enter 0 in the field “Filter 1”.
If you leave the field, the page retrieves the document type: Quote.
The options in default Business Central are:
- 0 = Quote
- 1 = Order
- 2 = Invoice
- 3 = Credit memo
- 4 = Blanket Order
- 5 = Return Order.
Filter security only works when assigned to permission sets, so we need to link permission set(s) to the filter line :
- Open the window Permission Sets per Field Security by clicking on the number in the line in the column “No. of linked Permission Sets".
- Click “New”
- In the first line, select the AssistEdit button
- To achieve the largest flexibility and security, it is advisable to create a permission set per document type e.g. as per example earlier. Select the appropriate set for that line.
- Click “OK”
- Do this for every line you created.
Now that the purchase header is split up, we can do the same for the lines.
Business Central supports creating several types of lines, by default ' ', which is used for text and empty lines, G/L Account, fixed assets and Charge (item).
As an example, we authorize on both the document type and line type, for which we need a second filter as follows.
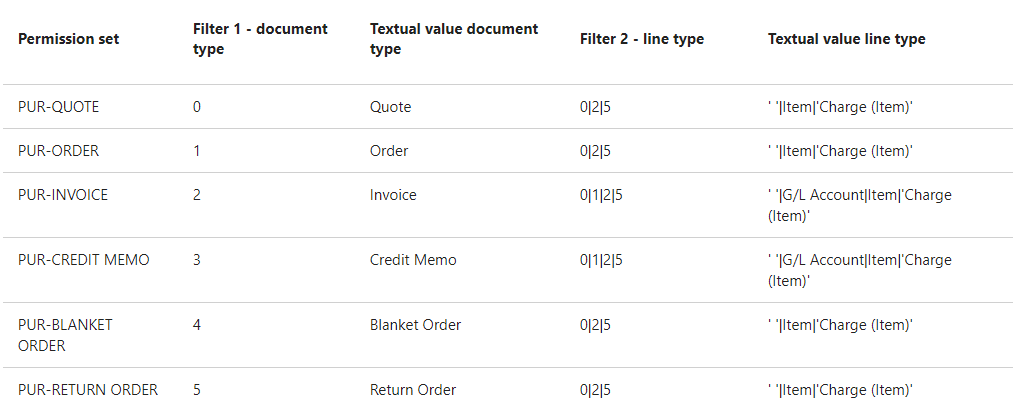
- Permission set is the name of the permission set we are going to create a filter for.
- Filter 1 - document id is the place in the option list the document type is found;
- Textual value is the readable version of the document type or line type;
- Filter 2 - line type is the place in the option list. | (pipe character) means ‘or’, so 0|2|5 means : line type 0 or 2 or 5. This enables you to filter on multiple values.
Create a new Filter security and choose the table Purchase Line (for this example) which is object id 39.
Just like for the table Purchase header, we need to filter on the field Document Type.
For quotes, enter option id 0 in the field “Filter Field 1”. The textual values are retrieved.
The second filter is on the line type. Open the Field List by choosing the AssistEdit button in the field “Filter Field 2” and choose Type. Alternatively, enter the field id 5.
For quotes, enter option id 0|2|5 in the field “Filter Field 2”. The textual values are retrieved.
This is the filter on the lines of purchase quotes. Now, in this example, we need to link the permission set “PUR-QUOTE” to these filters.
In line go to the column ‘No. of linked Permission Sets’ and click on the number in that column. The page Permission Sets opens.
If the permission set isn’t visible yet, click “New” and click on the AssistEdit button.
Filter on the name of the permission set, select it and click “OK”.
Do this for every document type as described in the overview above and select the appropriate Assigned permission set.
For unique assignation, every document type needs a separate line.
! Note : the Filter security is only active if linked to permission sets.
It is inactive if :
- a user has linked permission set(s) assigned to the Filter security AND a permission set with both insert, modify - and optionally delete - permissions which is NOT linked to the Filter security;
- the Starting date doesn't contain a date in the past or present;
- the End Date (when used) is a date in the past. (!);
- a user has not been given the permission set 2C FIELDSEC USE.
To activate this Filter Security, the user who set up this Filter Security should log out and then in again of Business Central.
This applies also to the user(s) for which this Filter Security was set up.
¶ Filter Security Advanced
In addition to the functionality presented by default, Filter security offers some more advanced options.
Filter Security accepts plain text filters and numbers. Furthermore, any filter used on a list in Microsoft Dynamics 365 Business Central is accepted.
The only limitation is that filter values must be plain text.
Use of variables (like T for today's date), SQL queries and calling methods is not supported.
Test any filter before configuring the field security on the list itself;
e.g. if you want to filter items on the field Type, manually filter on the value and test whether it works with the values as expected. Any line in the results is authorized to the user.
.png)
¶ Calculated Filter
A Calculated Filter is used to filter by System Variable (User ID, User Security ID and Current Company, by type Date Formula and by the logged in user where the system can use the table 91 (User Setup) and table 156 (Resource).
The User ID is available in the ‘User Setup’ . The filter on the Resource is based on the field ‘Time Sheet Owner’ User ID.
These filters are dynamic filters (based on the logged in user):
1. Date Formula: e.g. only orders in the current month will be visible or available to edit. (Entering dates and times in Business Central - Business Central | Microsoft Learn) The formulas are placed between angle brackets <> to make them universal.
2. System Variabels: use data which will be available in the current sessions regarding :
- Current company;
- Current User Id;
- Current User security Id;
3. Related Field: Use values from tables related to the currently logged in user, where there are 3 starting points:
- User (based on User Security ID, value is known for the currently logged in user)
- User Setup (based on User ID, value is known for the currently logged in user)
- Resource (based on field Time Sheet Owner ID which uses the User ID)
With these starting points, establish a relationship with other tables, to use those values for dynamic filtering.
E.g.: ‘filter on the purchaser code related to the logged in user’, or ‘ filter on employee number of the user’, or ‘filter on the cost center of the employee of the user’, etc.
The field Filter Value Type must be set to Calculated instead of Manual. After that, a Calculated filter can be selected in the Calculated Filter Field. Examples of Calculated Filters can be imported from the Calculated Filters setup page with the button Load Demo Data.
It is also possible to add new Calculated Filters. Search for Calculated Filters and in that list new filters can be added.
Permission to edit a part of the table is granted by linking a permission set to a line in the Filter security. Link permission set(s) to the field which was entered in the previous step.
To link permission set(s) to a filter:
- Choose Linked Permission Sets on the ribbon under Line to open the window Permission Sets per Filter Security.
.png)
Alternatively, click on the number in the column ‘No. of linked Permission Sets’ on the line.
.png)
- Click “New”
- Select the first line and use the AssistEdit button which opens the page Permission Sets.
- Select the permission set you want to assign the filter to.
Note: Keep in mind that probably additional permission sets are required for every filter if a complete split of the table is required. In that case it is important to use logical names for ease of management and documentational purposes. - Confirm the selection by clicking “OK”.
- Do this for every line you created.
! Note : the Filter security is only active if linked to permission sets.
It is inactive if :
- a user has linked permission set(s) assigned to the Filter security AND a permission set with both insert, modify - and optionally delete - permissions which is NOT linked to the Filter security;
- the Starting date doesn't contain a date in the past or present;
- the End Date (when used) is a date in the past. (!);
- a user has not been given the permission set 2C FIELDSEC USE.
To activate this Filter Security, the user who set up this Filter Security should log out and then in again of Business Central.
This applies also to the user(s) for which this Filter Security was set up.
¶ Filtering on multiple fields
It is possible to use multiple filters for a much more detailed authorization, e.g. in table Sales Header
In this example a filter has been set up, where a Sales Order is editable only where the Salesperson is the one who is logged in and only when the Order date is in the current month.
.png)
If more than two filters are required, the same permission set can also be added to more lines in the Filter security.
¶ Hiding lines using filter security
Compliance Filter Security has the option to hide parts of a table based upon filters, e.g. posting groups or G/L account numbers. If used, the extension hides any lines users are not authorized to see. No custom code is necessary.
At the moment only default pages in Dynamics 365 Business Central are supported.
Filtering is only possible in the same table.
- Search for ‘Filter Securities’.
- Click on “New”
- Select the ID of the table that has to be secured on field level. Either the list of tables can be used or enter the object id directly.
A Filter Security record number will be created automatically. (the option of ‘Default Nos.’ has to be activated in the no. series for the Filter Securities in the set up.)
- Add a Description for this record, e.g. Visibility table 38
- Lines have by default the value ‘Editable’ in the field “Filter Type”. Change this to ‘Visible’.
- Choose the field to filter on in “Filter Field 1” by opening the list of fields in the table through the AssistEdit button or enter the field Id.
- Set the filter value to be used in the field “Filter 1”.
Assign permission (set(s)) to the filter line :
- Open the window ‘Permission Sets per Field Security’ by clicking in the line on the number in the column of “No. of linked Permission Sets.
- Click “New”
- Select the first line and use the AssistEdit button to select a permission set
- Click “OK”
- Do this for every line you created
! Note : the Filter security is only active if linked to permission sets.
It is inactive if :
- a user has linked permission set(s) assigned to the Filter security AND a permission set with both insert, modify - and optionally delete - permissions which is NOT linked to the Filter security;
- the Starting date doesn't contain a date in the past or present;
- the End Date (when used) is a date in the past. (!);
- a user has not been given the permission set 2C FIELDSEC USE.
To activate this Filter Security, the user who set up this Filter Security should log out and then in again of Business Central.
This applies also to the user(s) for which this Filter Security was set up.
¶ Skip on Indirect Approval Actions
In the Field Security Setup, there is a switch with which it can be decided if Indirect Approval Action have to be skipped.
Default this switch is turned to ‘Off’.
Should it be desired that the Filter and Field Security is skipped when in purchase or sales orders the status ‘Pending approval’ changes, this switch should be turned to ‘On’.
¶ Dynamics 365 Copilot to create a Filter Security
We created a Copilot which can be used to create a Filter Security.
Generate a Filter Security by using prompts.
To watch a demo on how to use the Copilot option, watch the video on our YouTube channel.
¶ Create a Filter Security with the wizard
Search for ‘Field Security Setup Wizard’ and click on “Next”.
Toggle the switch for Filter Security to on.
Click “Next”.
Select a table in which you want to secure the fields, by using the drop down button or enter the object Id or the table name in the “Table ID” field.
After selecting the table, add filters on the lines.
- Choose a field to use for splitting the table in field “Filter Field 1” or enter the field Id.
- Enter the value to filter on in the field “Filter 1” by text. For “option” fields (e.g. Document Type in table Purchase Header) the options might be retrieved by entering 0|1|2|3|4|5|6|7|8|9 (for Quote|Order|Invoice|Credit Memo|Blanket Order|Return Order|6|7|8|9) . The software retrieves the textual value. Any filter which is not required can always be removed afterwards.
In Filter Security, we made it possible to use calculated filters.
For instance, with a calculated filter security it is possible to show only Sales orders where the salesperson is the logged in user (by using the calculated filtering on the Sales person code) of a certain period of time (e.g. only orders of this month).
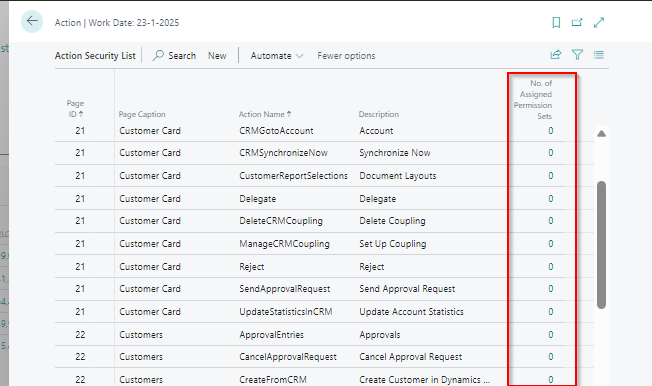
¶ Action Security
Search for ‘Action Security List’ and choose the related link.
A list of Action Securities will show.
¶ Assigning an Action Security to a user
In order to assign an Action security to a user, Permission sets have to be linked to the Action.
If a user is linked to a Permission set that is linked to the Action security, this means that the user can NOT execute the action.
Select the correct line and click on the number in the column “No. of Assigned Permission Sets”.
With “New” add Permission Sets to this Action security.
Use the AssistEdit button to select one or more Permission sets.
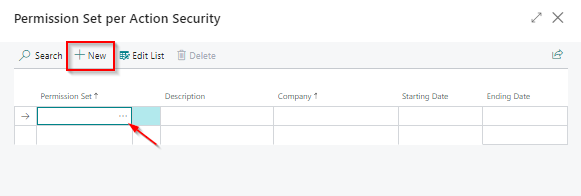
When finished, click “Close” to return to the Action security list window.
To activate the Action security, the user for which an Action security is set up should log out and log in again to Business Central
You cannot delete, rename or change the description of Action Securities as they are delivered with Compliance Field Security. If you have suggestions for new Action Securities please let us know.
¶ Customization
With Compliance Filter Security it is possible to setup visibility filters on records and to secure actions on pages. By default, this is possible for various default Dynamics 365 Business Central pages and actions (see ‘Action Security List’ and ‘Pages with Visibility Security’). This is done by using event subscribers on those pages / actions.
If you want to apply this to non-standard pages and actions included in add-ons or customizations, you / the partner have to add your own events for these pages.
The events that should be added are shown below for the Filter Security and Action Security.
For the Filter Security page, extension customization can be used for the visibility and/or editability of fields or even columns.
If it is required to add events for Dynamics 365 Business Central standard pages and actions that are not yet available in our app, please send an event request to support@2-controlware.com and specify what kind of event and on which page or action an addition would be required.
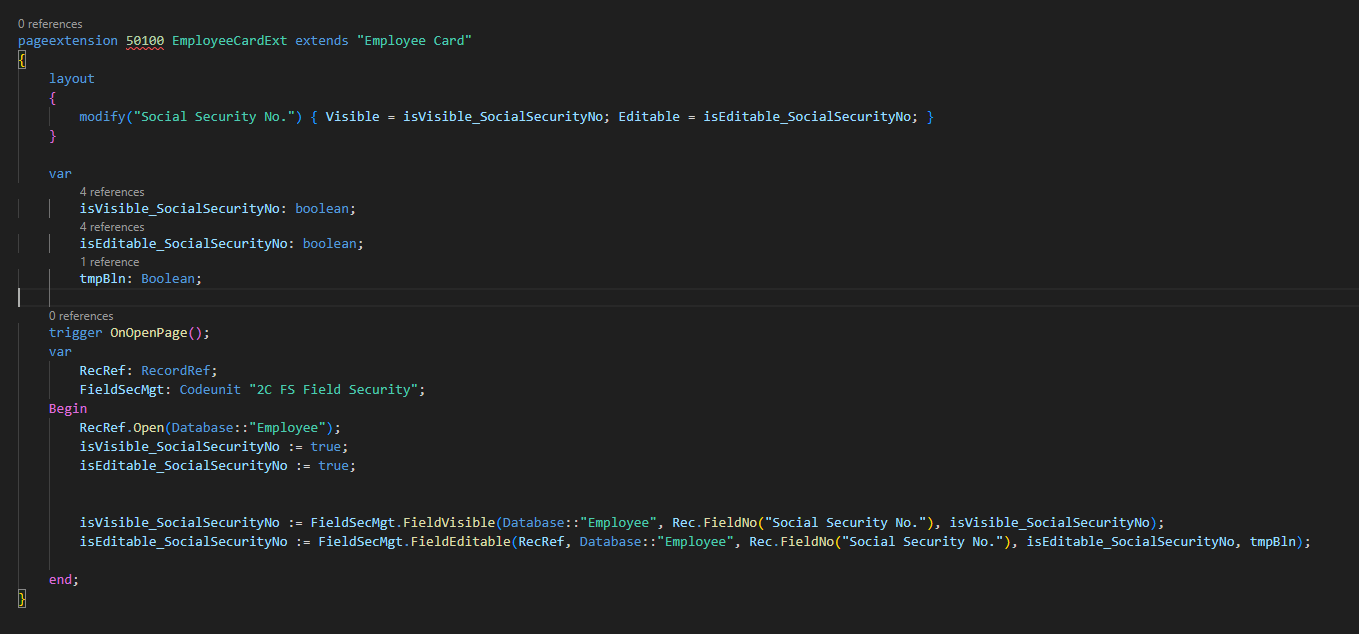
¶ Field Security
You can change the visible and/or editable properties of a field on a page by implementing a Page Extension, which uses the Field Security app logic, to determine whether a field is visible and/or editable or not.
! Note : Keep in mind, that other extensions, which might also change the same properties, may affect the functioning of this Page Extension.
Example of a visible/editable security on the Employee Card:
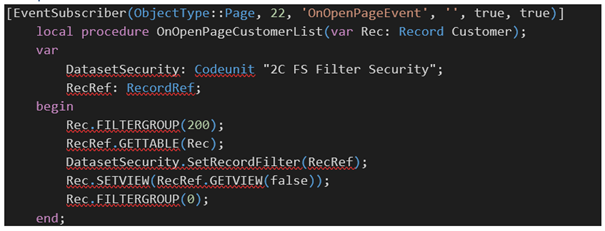
¶ Filter Security
Start by creating a custom Codeunit in which all the needed event subscribers are defined. Do not forget to assign permissions to this Codeunit for the relevant users. Furthermore, we strongly advice to first implement the new events in a test environment.
To setup an event subscriber for visibility security, the code below can be used as an example:

Example of a visibility security on customer list:
¶ Visibility filtering Customization/add-on pages
In Filter Security, records can be hidden based on a filter, as long as a certain event has been added to the page where the security is applied that calls our code. We did that for standard Business Central pages, out of the box for a lot of pages. When a table has been selected in a Filter Security, a field in the header (under “Show more”) shows the number of pages related to the chosen table.
When a page that would be expected is not visible there, it probably is a custom / add-on page and a piece of customization will have to be added to be able to use the visibility filter on it. Simple customization concerns one event per page with almost the same code.
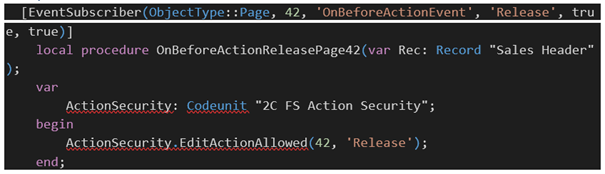
¶ Action Security
Start by creating a custom Codeunit in which all the required event subscribers can be defined. Do not forget to assign permissions to this Codeunit for the relevant users. Furthermore, we strongly advice to first implement the new events in a test environment.
To setup an event subscriber for action security, use the code below as an example:
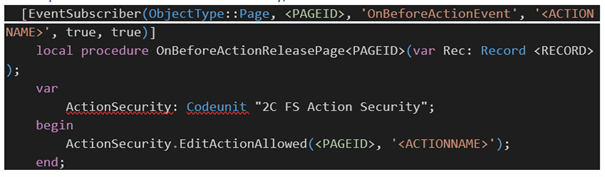
Example of action security for Release on Sales Order:
Finally, for Action security a record has to be added to table 70078130 that includes a new Action Security record so permission sets can be linked to it. RapidStart can be used to create this record.
Example of a record:
| Type | Page ID | Action Name | Page Name | Page Caption | Table ID | Table Name | Table Caption | Description |
| Action | 39 | Post | General Journal | General Journals | 5406 | Prod. Order Line | Prod. Order Line | Post |
¶ Effective Field Security and/or Filter Security per Source
In this overview the effective situation of Field and Filter Security can be found.
Determine with the settings, what exactly has to be shown, all fields with permission per source or only the fields in the Field or Filter security.
This can be set up in the Field Security Setup.
Choose between :
- All Fields with Access (the overview will show all fields that are editable)
- Only Fields in Field security (the overview shows only fields that are mentioned in the Field Security )

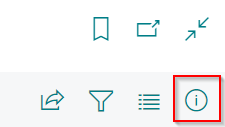
When searched for “Effective Field Securities” or “Effective Filter Securities” and that screen has been opened, clicking on the exclamation mark button on the top right corner will expand the Factbox pane on the right side of your screen.
This can be done on the main screen when opening the Summary
Or when the screen of the Field Security itself has been opened (by clicking on “Field Security” on the top left of the screen)
.png)
Where also clicking on the exclamation mark button in the top right of the screen will open the factbox

Click on “Calculate” to get the current active Field Securities which have been set up.
When clicking on a line, the factbox will show what applies to that security only.
E.g. when clicking on a line of a user, the factbox will only show the permission sets of that user that play a role in that security.
The same for the line of a permission set, in that case the factbox will show only the objects that play a role in that security.
The permission sets shown in the summary are the sets that are applicable for that security, regardless of the users summarized.
¶ Filtering the Summary
Filter Source Type : Filter if you want the calculation based on a User or a Permission Set
Filter Source No. : use the AssistEdit button to select a User or Permission Set to calculate
Filter Table ID : use the AssistEdit button to select a table ID to calculate
Field Security : shows the Field Security of the line selected in the summary
.png)
¶ Added functionality on filtering in the security settings
Since our release 5.1.202404NN.0 from April 2024, some functionality has been added to make it easier to check Field- or Filter security settings :
- A button ‘Efffective securities’ has been added to the Field Security page, which allows you to calculate the sources (Users or Permission Sets) associated with the secured table. On the ‘Effective Securities’ page, filters can be set on a Field Source Type and Source No. for which a new calculation can be executed using the 'Effective Securities' button. When the calculation is complete, only the results for the filter used will be visible.
.png)
.png)
- A second button is added to calculate the ‘Not secured Users/Permission Sets’ concerning that particular security. In this summary, the column 'Cause Permission Set ID’ shows why the user is not linked to the secured table. On this basis, an error in the setup can easily be found and corrected.
.png)