¶ Field Security app
This module contains shared objects and functionality with other modules we are currently developing. Additionally, we have the Compliance Essentials app which contains shared objects with our extensions Compliance Field Security and Compliance Field Validation.
For use (and on premise compilation) of our extensions Compliance Field Security and Compliance Field Validation, the Compliance Essentials is required for compiling and use of both Security extensions, as objects and in the license.
The Compliance Essentials module comes with no additional costs and is by default attached to any of our 2-Controlware Compliance extensions for Microsoft Dynamics 365 Business Central.
Default Dynamics 365 Business Central (both on-premise and hosted versions) offers no functionality to secure or validate fields within tables. Often, the default permission sets do not provide the desired level of security. Furthermore, you cannot easily apply security based on a filter. Finally, in default Business Central it is not possible to secure actions on pages.
The extension Compliance Field Security offers the possibility to secure fields, actions on pages and datasets in tables. With the module Field and Dataset Security the data owners are able to manage their own field security and dataset security.
Field Security : refine the authorizations of a specific table by defining secured fields
Filter Security : enhance the authorization for certain dataset by defining secured datasets
Action Security : assign specific actions on a page to a limited number of users
!NOTE : When the Field Security extension has been installed, a notification will appear (in a green bar at the top) that the setup has yet to be finished. The link in that notification will send open the Setup Wizard. When going through the Wizard, please do not skip the Registration, else the app can not be used properly.
¶ Registering and applying default package
To use the Field Security extension it is required to register the module after every installation.
In Business Central search for “Field Security setup”. (not “Field Security Setup Wizard”)
Click on “Register” and fill in the fields.
Click “Save”.
Click on “Load default data” and the default package will be imported.

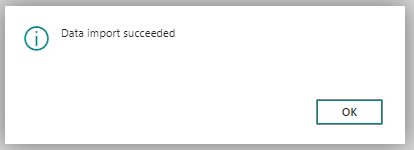
After a successful import, a message appears that the Data import succeeded.
In “Numbering” click in the Field Security Nos and choose “New” to assign the letters the Field Securities need to start with and the number range in between these numbers should fall.
It is also required to fill in a Starting date. Select if the ‘increment-by No.’ is required and if ‘Gaps are allowed’ in the numbers.
When a new Series has been made, click on “OK” and this code with number range will be used for the Field Security records.
Do the same for the Filter Security Nos.

¶ Field / Filter Security license
When registration has been sent, a trial period starts.
If use of the application for a longer period of time is required, application for a license is required after this 30 day trial.
The end date of the trial is visible under the License Information.
To apply for a license, go to the Field Security Setup and click on Request License in the top bar.
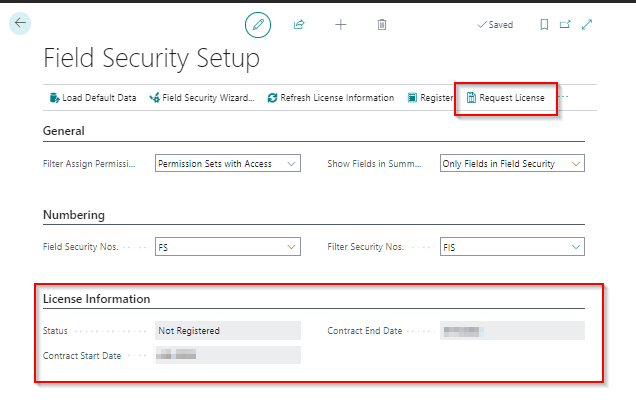
In case a license is already acquired, the Status will change from Trial (after registration) into Licensed within 24 hours.
¶ Field Validation App
This module contains shared objects and functionality with other modules we are currently developing. For use (and on premise compilation) of our extensions Compliance Field Security and Compliance Field Validation, the Compliance Essentials is required for compiling and use of both Security extensions, as objects and in the license.
The Compliance Essentials module comes with no additional costs and is by default attached to any of our 2-Controlware Compliance extensions for Business Central.
Default Business Central offers no functionality to enforce business rules and enhance data quality in the system. When creating new items, customers and suppliers, it is important that fields such as booking groups, valuation method and payment conditions are correctly filled in. Managing master data yourself can be very time consuming, but for a correct processing of (internal) orders it is important that the master data is correct.
With the extension Compliance Field Validation the quality of your internal information processing will be enhanced. For every table (default, partner or customization) you can determine requirements of field values entered. Depending on the setting, the user will receive a warning or an error.
!NOTE : When the Field Validation extension has been installed, a notification will appear (in a green bar at the top) that you have to finish the setup. The link in that notification will send you to the Setup Wizard. When going through the Wizard, please do not skip the Registration, else the app can not be used properly.
¶ Registering and applying default package
To use the Field Validation extension it is required to register the module after every installation.
In Business Central search for “Field Validation setup”. (not “Field Validation Setup Wizard”)
Click on “Register” and fill in the fields.
Click “Save”.
Click on “Load default data” and the default package will be imported.

After a successful import, a message appears that the Data import succeeded.

Click in the Table Validation Nos. field and choose “New” to assign the letters the Field Validations need to start with and the number range in between these numbers should fall.
It is also required to fill in a Starting date. Select the ‘increment-by No.’ if this is required and if ‘Gaps are allowed’ in the numbers.
When a new Series has been made, click on “OK” and this code with number range will be used for the Field Validation records.
¶ Field Validation license
After the registration, a trial period starts.
To use the application for a longer period of time, it is required to apply for a license after this 30 day trial.
The end date of the trial is visible under License Information.
To apply for a license, go to the Field Validation Setup and click on Request License in the top bar.
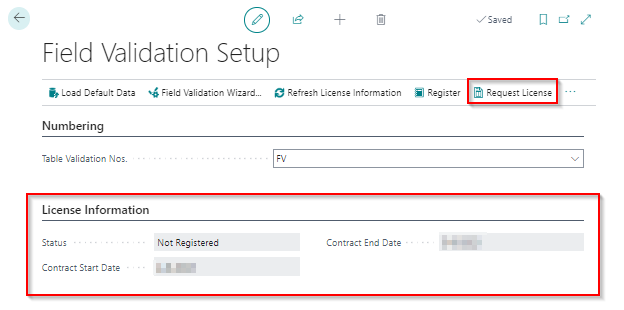
In case a license is already acquired, the Status will change from Trial (after registration) into Licensed within 24 hours.
¶ Setup Permission Sets
After installation of a field validation, field, filter or action security or inventory reconciliation extension, the specific permission set needs to be assigned to user(s) in order to work.
Search for Users.
Select the user account on which the Permission Set has to be added and choose “Edit”.
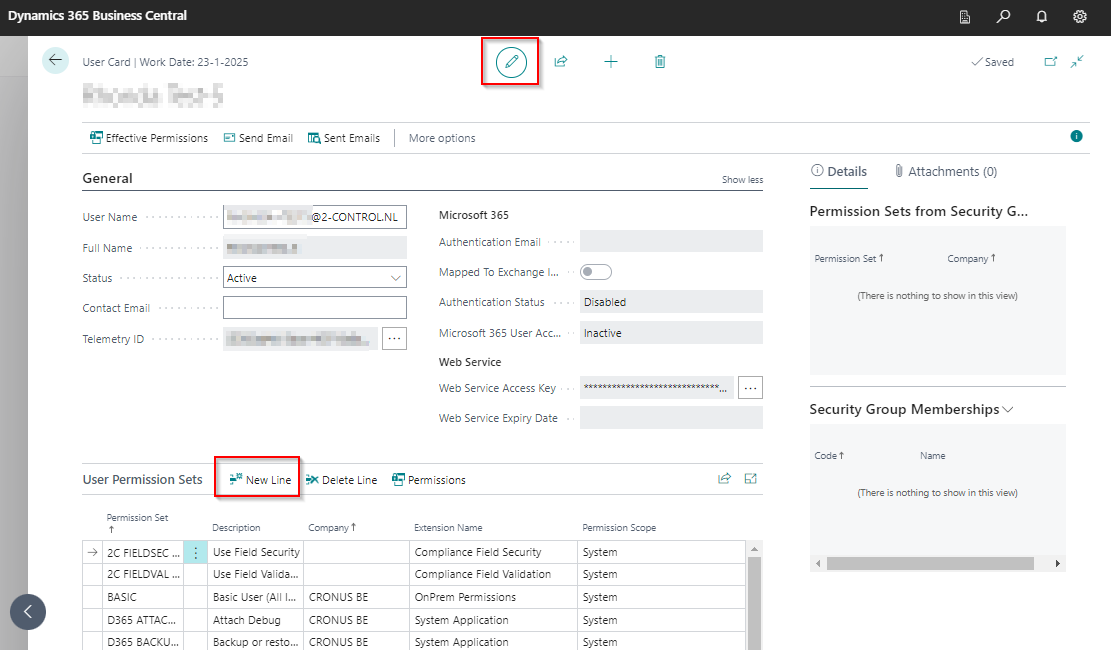
Click on “New Line” to add a Permission Set.
To remove a Permission Set, click on the description of that Permission Set and then click “Delete Line” or click on the 3 vertical dots between the Permission Set and the Description and choose “Delete Line”.
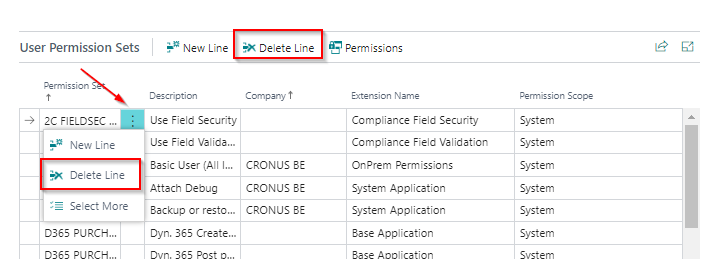
Check whether the specific permission set is present. This is required for use of the extensions.
The specific permission sets for the extensions are :
- 2C FIELDSEC USE : permission set to use the Field, Filter and Action Security extension
- 2C FIELDVAL USE : permission set to use the Field Validation extension
- 2C IR RECONCILIATION : permission set to use the Inventory Reconciliation extension
!NOTE : add the required permission set to any newly created user account, otherwise the extension gives an error.
Repeat this for every user the Permission Set(s) has to be assigned to.
Keep in mind that you need an account with SUPER-permissions to assign and remove permission sets to users.
Alternatively, the SECURITY permission set might also be assigned if you have ALL permissions you assign yourself. However, for ease of administration we strongly recommend to administer authorizations using SUPER.
¶ Setup Table Relations
Table relations tell the extension Field Validation how two tables in Business Central are related. Based upon default Business Central we supply table relations, which you can use and examine as example for creating one yourself.
¶ Creating a Table Relation :
Search for Table Relations List.
Click “New”.
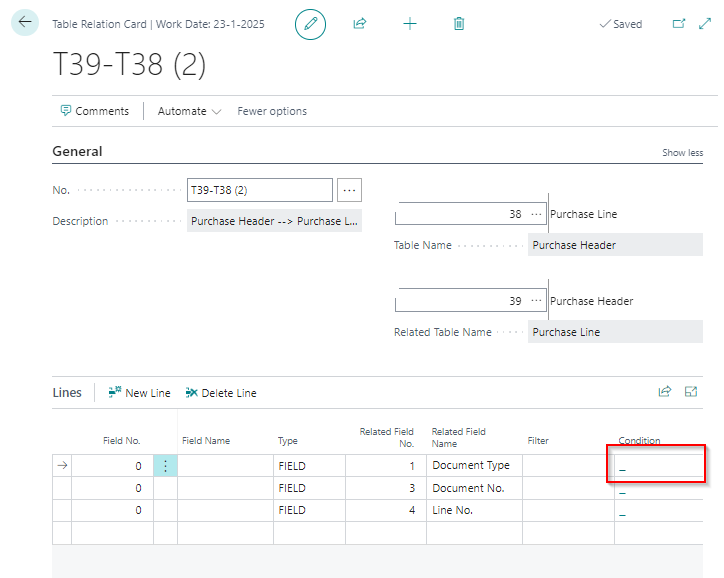
In the Field No. add the number of the relationships. E.g. if you want to make a Table Relation between the tables 39 and 14, you could name this relation T39-T14. If you are not sure yet which tables you will be making the relation for, you can first choose/add them in the fields on the right side.
In the fields on the right side you are to choose/fill in the tables you want to make a relation between. You can choose the table from the list by clicking on the AssistEdit button or enter the id manually.
The top field contains the number for which you want to set up the field validation. The second field holds the number of the table to use as the source for validation.
When you have chosen the 2 tables, the lines will be populated with the field(s) linking the tables (database terminology: primary key). You can choose to have the relation based on only 1 field by removing the other fields (when applicable)
Optionally you can limit the number of records from the table to be validated, e.g. only items with a certain group or sales prices for all customers.
Click on “Conditions” (at the end of the line).
In Field No. click on the AssistEdit button and select the field you wish to use for filtering.
In the Filter field enter the value you want to filter on.
Click “Close”.

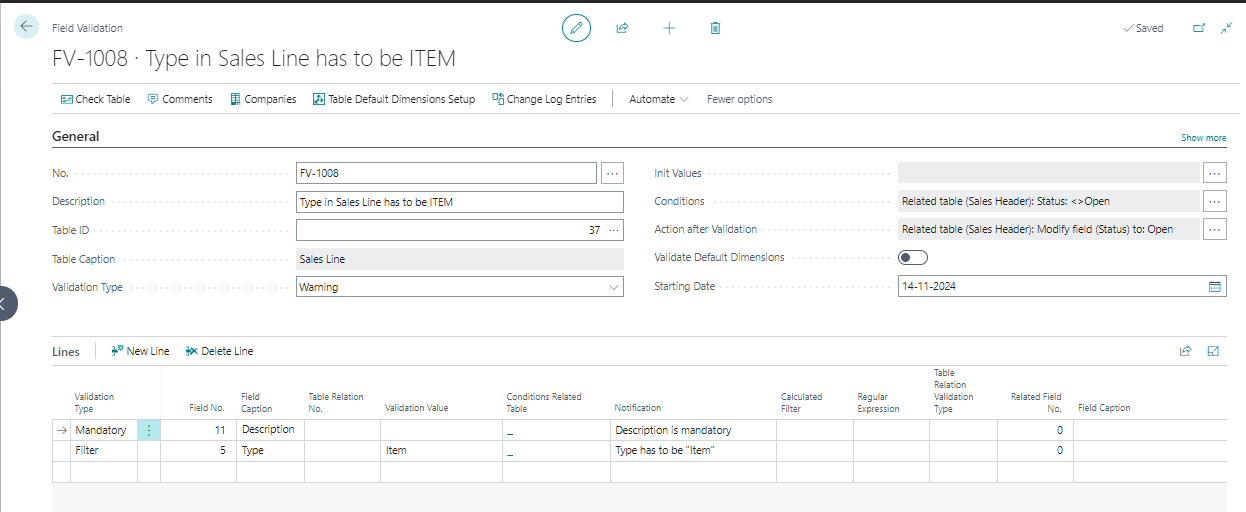
¶ Short example of a Field Validation using a table relation in the conditions in the header
In this example, we want the type in a sales line to be an Item and the description to be mandatory.
The validation will be triggered when in the sales header the status changes from “Open” to “Released”. Important is to not forget to check the box to “Execute validation on Related Table modifications”.
If the rules in the validation have not been met, the status in the sales header will change back to “Open”.
.png)
.png)
¶ Inventory Reconciliation
You can only use the “Buy Now” button to install the extension, with which automatically a free trial period of 1 month will start. After 1 month you would have to purchase a license to run an analyses to the current day.
After installation of the Inventory Reconciliation extension you will automatically get the question to setup the app with a wizard.
You can also use the “assisted setup”, should the question not appear.
The wizard will guide you through the necessary steps.
You can also choose to install the extension with below instructions.
NOTE : To use the Inventory Reconciliation extension, it is required to register the module.
¶ Registering
In Business Central search for “Inventory Reconciliation Setup”
Click on “Register” and fill in the fields.
Click “Save”.

¶ Inventory Reconciliation license
In the fasttab “License Information” you can find if it concerns a Trial (free) version or if it is a Licensed version, with the applicable Registration and/or Trial Expire date.
In case of a Trial version, only the first 3 months of stock entries will be analyzed.
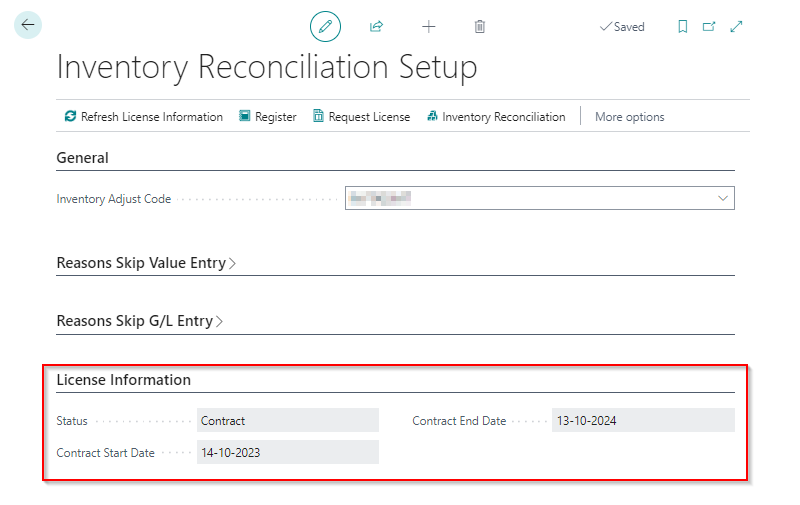
Should you already have purchased the license, the Status will change from Trial to Contract within 24 hours after registration.
¶ Advanced Permissions Recorder
Login as a user.
Follow the steps below to set up the extension Advanced Permissions Recorder.
After installation of the Advanced Permissions Recorder extension you will automatically get the question to setup the app with a wizard.
You can also use the “assisted setup”, should the question not appear.
The wizard will guide you through the necessary steps.
- Follow the steps in the wizard.
- Next, press the button Register; this is required to use Advanced Permissions Recorder.
- After the registration step, the setup of the Advanced Permissions Recorder extension is completed and the screen to start recording permission sets will open automatically
The Advanced Permissions Recorder does not require a license and can be used freely after the registration.
You can find a video on YouTube for this powerful tool.